The Issue
I recently purchased myself a new Lenovo X1 Cabon Laptop for work. The problem is that I run a flavor of Ubuntu and, though the hardware is Ubuntu certified, there is a known issue with the MIPI webcam models and for the particular hardware combination I was looking for, I had no choice but to go with that model. Lenovo and Canonical have not managed to provide any simple instructions as to how to resolve this despite the issue being ongoing for years at this point.
The official approach seems to be to follow the steps outlined across 4 separate git repos.
The process is extremely technical, including the need to patch the Kernel with the intel drivers, and even when following the steps as outlined the issues are many. I managed to make it through the entire setup, only to be disappointed when gstreamer ended up throwing errors.
After spending my weekend powering through this, I managed to get a working solution running using some undocumented Canonical repos that contain the correct camera drivers and v4l2, and after configuring v4l2-relayd properly.
Full disclosure: This is undeniably a hack, essentially the idea is that v4l2-relayd turns your camera on when an app calls for it and it streams the camera to a v4l2loopback virtual device, which in turn is what your browser, Zoom, Discord, etc pick up. Is this crazy? Yes, but it is what Lenovo officially suggests until they can get a fix published. I have found occasionally my camera will stop working and I need to restart v4l2-relayd, I think this is the result of a race condition where the app requests the camera before the v4l2loopback device is serving it, but I am not certain. I also found that I was totally unable to get the default snap Firefox install to recognize my camera. That is somewhat unsurprising though, as the snap install has a number of issues connecting with gnome apps.
With that out of the way, I wanted to provide the steps that ultimately got me up and running since there is barely any documentation to this approach, even on the repos themselves, and I would have loved to have some instructions while I was doing this.
Update: October 2025
I recently bumped my system from LM 21 on kernel 6.5.0 to LM 22 on kernel 6.8.0. This once again blew up my camera, and there aren’t many linux-modules-ipu6 or linux-modules-ivsc entries above 6.5.0 in the dev ppa.
Here are the steps I followed to get my camera working again after this upgrade. Your mileage may vary.
sudo apt update
sudo apt upgrade
sudo apt remove linux-modules-ipu6-$(uname -r)
sudo apt remove linux-modules-ivsc-$(uname -r)
sudo apt remove intel-ipu6-dkms
sudo apt remove libcamhal0
sudo apt-get autoclean
sudo apt-get autoremove
sudo add-apt-repository ppa:oem-solutions-group/intel-ipu6
sudo apt update
sudo apt install libcamhal-ipu6ep
sudo add-apt-repository -r ppa:oem-solutions-group/intel-ipu6
sudo apt install intel-ipu6-dkms
sudo reboot
The Fix
First, you’ll need to add the OEM Solutions PPA to your system. This PPA includes a number of kernel-specific binaries that are essentially prepared for you from the process outlined in the ipu6 repos linked above. If you don’t want to install the ppa, it is possible to accomplish everything done here manually, but I personally ran into issues. I have had this PPA break my camera multiple times, so I recommend removing it when you are done.
sudo add-apt-repository ppa:oem-solutions-group/intel-ipu6
Once you’ve installed the ppa, you’ll need to update to find the new packages
sudo apt update
Next, you’ll need to identify your kernel version. You can do so with the uname command. For what it’s worth, I am running the 6.1.0-1025 OEM Kernel on the X1 Carbon Gen 10.
uname -r
After you’ve identified your kernel version, you can install the correct version from the list of packages installed by the ppa.
sudo apt install linux-modules-ipu6-<your-kernel-version> linux-modules-ivsc-<your-kernel-version>

After the kernel patches are installed, you should make sure that you’ve installed the ipu6 drivers.
sudo apt install intel-ipu6-dkms libcamhal0 libcamhal-ipu6ep0 libipu6ep
v4l2-relayd and gstreamer should have been installed at this point, but you’ll need to install v4l2loopback-dkms. We’ll also install v4l-utils in order to confirm that things are set up correctly.
sudo apt install v4l2loopback-dkms v4l2-relayd v4l-utils
You’ll also want to make sure that gstreamer1.0-icamera is installed, this should have happened automatically, but I have heard instances where it was missed.
sudo apt install gstreamer1.0-icamera
It is also a good idea to make sure that libgsticamerainterface is installed.
sudo apt install libgsticamerainterface-1.0-1
After installing everything, update the newly added modprobe config file for the Virtual Camera
# backup the conf file first
sudo cp /etc/modprobe.d/v4l2-relayd.conf /etc/modprobe.d/v4l2-relayd.conf.old

# you can also use nano if you don't have or don't like vim
sudo vim /etc/modprobe.d/v4l2-relayd.conf
In the editor, rename the device from “Virtual Camera” to the name that you want to see in device lists, I named mine “Intel MIPI Camera”, and add the devices and video_nr parameters.
options v4l2loopback devices=1 video_nr=0 exclusive_caps=1 card_label="Intel MIPI Camera"
Now we need to make sure that v4l2-relayd picks up our camera since the default is a test source. There is a conf file located in /etc that we can edit.
# backup the conf file first
sudo cp /etc/v4l2-relayd /etc/v4l2-relayd.old

# edit the file
sudo vim /etc/v4l2-relayd
In the editor, we need to update VIDEOSRC so it points at icamerasrc, we need to update the ouput format and dimensions, and we need to make sure that our card label matches what we defined in modprobe.
# GStreamer source element name:
VIDEOSRC=icamerasrc

...

# Output format, width, height, and frame rate:
FORMAT=NV12
WIDTH=1280
HEIGHT=720
FRAMERATE=30/1

# Virtual video device name:
CARD_LABEL="Intel MIPI Camera"

...
Finally, reboot the system.
sudo reboot
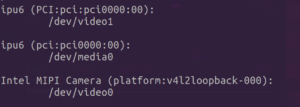
After a reboot list the video devices and confirm that you see your virtual camera, the device number is correct, and it is not showing as busy.
v4l2-ctl --list-devices
If you see your device listed, you can also make sure that v4l2-relayd is enabled and running.
sudo systemctl status v4l2-relayd.service
If you see the service active, you should now be all set. Give your camera a test in Chrome or Cheese. Cheese may try to pick up ipu6 by default, if this happens just select the virtual camera and restart.
As mentioned above, if you are running the default snap install of Firefox, you will probably have issues with the camera in Firefox specifically. My solution for this was to install from apt as I was having other issues with the snap version of Firefox as well.
—
Important: You may, unfortunately, need to remove and re-install the drivers from time to time when your kernel version has minor updates
—
If the service is not active, make sure it is enabled and then try restarting it.
sudo systemctl enable v4l2-relayd.service
sudo systemctl restart v4l2-relayd.service
sudo systemctl status v4l2-relayd.service
After confirming the camera works, remove the ppa
sudo add-apt-repository -r ppa:oem-solutions-group/intel-ipu6
If the service does not start on system startup or will not start after a restart, you’ll need to examine the logs to figure out what went wrong. The most likely culprit will be a syntax error in one of the conf files for v4l2-relayd.
Getting this camera working has been an ongoing challenge and even users with the same PC seem to have lots of mixed results, so I can’t guarantee this will fix the issue for you, but here’s hoping. Good Luck!
23 replies on “Fixing Lenovo’s MIPI Camera problems on Ubuntu 22.04”
Jonathan
Thanks for a great guide! I got the MIPI camera working on Ubuntu 24.04 with a bit of help from Claude Code. Details here:
https://github.com/intel/ipu6-drivers/issues/228#issuecomment-3694537500
Lucy
Works for me with Ubuntu 24.04, dell 5490 and kernel 6.14. Thanks!
I also experienced this Referenced but unset environment variable evaluates to an empty string: SPLASHSRC and black camera output, when I changed in the file /etc/v4l2-relayd
from
WIDTH=1280
HEIGHT=720
to
WIDTH=1920
HEIGHT=1080
because it is mentioned as an error when running sudo gst-launch-1.0 icamerasrc ! autovideosink
But then I returned it to 1280×720, rebooted and it worked again
Balthxzar
I had the IPU6 camera working OOB on the latest version of F42, but unfortunately it was only working at 1280x720p30, however ov2740 in my X1C10 fully supports 1920x1080p60, after chasing down many forum threads to no avail, your section on editing v4l2-relayd finally worked to get 1080p to work, thanks!
Jonah
I’m trying to get this to work on my Thinkpad X1 Yoga Gen 8 running Kubuntu 25.04. I have a “working” video stream insofar as it shows up when I run v4l2-ctl –list-devices and can be seen by other programs, but it’s all black.
This is what I get from sudo journalctl -u v4l2-relayd.service
— Boot a3f6901d6ce84b57bf4dd69739b4412e —
Jun 23 13:15:21 Tatarubuntu systemd[1]: Starting v4l2-relayd.service – v4l2-relay daemon service…
Jun 23 13:15:21 Tatarubuntu systemd[1]: Started v4l2-relayd.service – v4l2-relay daemon service.
Jun 23 13:15:21 Tatarubuntu (sh)[1849]: v4l2-relayd.service: Referenced but unset environment variable evaluates to an empty string: SPLASHSRC
Jun 23 13:16:02 Tatarubuntu v4l2-relayd[1849]: gst_element_set_state: assertion ‘GST_IS_ELEMENT (element)’ failed
Dan
I’d double check:
– libgsticamerainterface-1.0-1 and gstreamer1.0-icamera are definitely installed
– The format that you set in /etc/v4l2-relayd is correct for your system
– icamerasrc is the correct video source id in Kubuntu
– What do you see when you run
gst-launch-1.0 v4l2src ! autovideosink? Any new errors or behavior?You’re close, just have to get over that last hurdle!
Eric Carlsson
I couldnt find linux-modules-ivsc-* but i worked fine either way
RLW
I’ve had my mipi IPU6 camera working on and off for over a year now, running Fedora on Lenovo X1 Gen 11.
The latest bugbear is that it is currently blacklisted as I write this. So editing `/etc/modprobe.d/ipu6-driver-select.conf` and commenting out the blacklisting line enabled the camera to work for me.
There are still issues with colour quality, but it is good FPS and it works, so better than nothing.
Allan
Fantastic. I have tried pretty much every other web site that offers a fix for the mipi camera and they all failed to fix mine (Dell XPS 16 9640). I followed your steps and viola! You, sir, are a genius. Thank you!
indy
Solved (for now?) installing `linux-headers-6.11.0-1006-oem` and `linux-modules-ipu6-6.11.0-1006-oem` after enablibg `noble-proposed` repository on Ubuntu 24.04 as per
https://github.com/intel/ipu6-drivers/issues/228#issuecomment-2453444886
Thanks for your help!
Dan
Glad to hear you managed to get it going!
Paul
Dude, thank you! I can finally delete Windows from my laptop 🙂
Rob
I have to restart the the service suing “sudo systemctl restart v4l2-relayd.service” from time to time, but besides that it works on my X1 Carbon Gen11 on Ubunutu 24.04 LTS now. Thanks a lot!
However, if I see the logs I get some issues I’d like to fix. Maybe you’ve got an idea:
Jul 30 13:38:30 userx systemd[1]: Starting v4l2-relayd.service – v4l2-relay daemon service…
Jul 30 13:38:30 userx systemd[1]: Started v4l2-relayd.service – v4l2-relay daemon service.
Jul 30 13:38:30 userx (sh)[2387]: v4l2-relayd.service: Referenced but unset environment variable evaluates to an empty string: SPLASHSRC
Jul 30 13:42:36 userx v4l2-relayd[2387]: Registering meta implementation ‘GstCamerasrcMeta’ without init function
Jul 30 13:42:49 userx sh[2387]: [07-30 13:42:36.674] CamHAL[INF] aiqb file name OV2740_CJFLE23_ADL.aiqb
Jul 30 13:42:49 userx sh[2387]: [07-30 13:42:36.675] CamHAL[INF] aiqb file name OV2740_CJFLE23_ADL.aiqb
Jul 30 13:42:49 userx sh[2387]: [07-30 13:42:36.676] CamHAL[ERR] invalid media format, default value used.
Jul 30 13:42:49 userx sh[2387]: [07-30 13:42:36.676] CamHAL[ERR] GetControl: Device node /dev/v4l-subdev16 IOCTL VIDIOC_G_EXT_CTRLS error: Invalid argument
I’m thinking especially about “Referenced but unset environment variable evaluates to an empty string: SPLASHSRC” – how can I fix that? Where should that env point to?
Dan
Especially on Ubuntu for some reason, the fix is not particularly stable and does require a restart of the service from time to time. What I did to work around that was to create a startup script that runs `systemctl restart v4l2-relayd.service`. Then register a cron task for root, to run the script on boot. That should make it so your camera works every time on startup. My experience with Ubuntu was occasionally the camera would crash and get stuck on after using it, and I’d have to manually restart.
It looks like the environment variable error may be related to kernel version compatibility based on some GitHub threads: https://github.com/stefanpartheym/archlinux-ipu6-webcam/issues/85 – I am not 100% sure, but I am guessing it may be related to the placeholder image that the camera is supposed to use when it’s closed. On my machine $SPLASHSRC is empty, but I don’t see the error.
For what it’s worth: I’ve been running Mint on the 6.5.0-1025-oem kernel with much more camera stability after applying this fix.
indy
Thanks for the reply. v4l2-ctl –list-devices shows it active running, but also files several repetitions of
“`
lug 15 17:45:09 snoopy sh[19020]: [07-15 17:45:09.609] CamHAL[ERR] invalid media format, default value used.
lug 15 17:45:09 snoopy sh[19020]: [07-15 17:45:09.609] CamHAL[INF] aiqb file name IMX390_HDR_TGL.aiqb
“`
while journalctrl states:
“`
(sh)[2091]: v4l2-relayd.service: Referenced but unset environment variable evaluates to an empty string: SPLASHSRC
mag 06 10:59:42 snoopy v4l2-relayd[2091]: g_param_spec_enum: assertion ‘g_enum_get_value (enum_class, default_value) != NULL’ failed
“`
Dan
Hmm, based on the errors you are getting. I’d check the following:
– Double-check that your modprobe conf settings didn’t get overwritten
– Make sure that linux-modules-ipu6 and linux-modules-ivsc match your kernel version exactly – It is pretty finicky
– Try running
gst-launch-1.0 v4l2src ! autovideosinkand see if that works or if you get any new errors– Take a look through this thread and this thread, and see if any of the suggestions point you in a new direction.
Good luck! It’s a long, windy road but you are getting close.
Indy
Lenovo Carbon X1 with Ubuntu 24.04, kernel 6.8.0-31, All OK except that the video is completely black!
Dan
Check to make sure that v4l2-relayd is running with
sudo systemctl status v4l2-relayd.service. Then look for errors withsudo journalctl -u v4l2-relayd.service.I’d also suggest checking if your v4l2 device is showing as “busy” when you run
v4l2-ctl --list-devices. If it is, you can trysudo systemctl restart v4l2-relayd.service. If restarting v4l2 helps, you can write a script that fires on startup and resets the service, which should prevent you from needing to do it manually every time.I had lots of issues with the video devices on Ubuntu, sometimes it would run fine and sometimes it’d require a restart on startup. Occasionally the camera would get stuck on and require a restart of v4l2. Mint has been a smoother experience for me.
Codef1re
You absolute legend, this worked for me and now my webcam works in teams and zoom calls again. X1 Carbon 10th gen running Zorin OS 17. Been fighting this for weeks when I switched my work laptop from windows to linux, tried loads of supposed solutions on various ubuntu based OSes and this guide finally got it working.
It still does not work in cheese and I read on some of the solutions that it won’t but it works where I need it and that’s all that matters. now just need to make sure my next laptop does not have an mipi ipu6 camera in it to avoid this headache.
Dan
Glad it worked for you!
To try and make Cheese work, you can go to Preferences and see if your Virtual Camera shows up there.
In Mint for me it just worked, but in Ubuntu I had to explicitly select the Virtual Camera, close Cheese, then re-open and it worked.
julius
Nice, it works on my generation 11 x1. Thanks internet stranger!
DQ
you can replace
`sudo apt install linux-modules-ipu6- linux-modules-ivsc-`
with
`sudo apt install linux-modules-ipu6-$(uname -r) linux-modules-ivsc-$(uname -)`
Mike Frisco
This is very cool, but also very not working on 20.10. 🙁
Dan
Sorry man, in my experience the whole process is super finicky in the best case. Have only had success with Ubuntu 22.04 and Mint 21.2, and even in those cases if you install the ppa during a week where they happen to be doing active development it may end up being broken.